So, you come to the community, and you see all these wonderful pictures that people post, on their own, and in blogs, and you wonder...
just how do I do that?
In this tutorial, I will try to explain the basics of posting a picture on the community site.
Please read on. C:
For this tutorial, I chose the website
Photobucket as my host site. The reason for this is that it is
FREE,
FAST, and fairly
RELIABLE.
The downside to this site is that it can sometimes distort the quality of your image.
Each step will have a picture to go along with it. The picture will have certain areas circled or otherwise highlighted, and below each picture, I will try to explain what those areas mean.
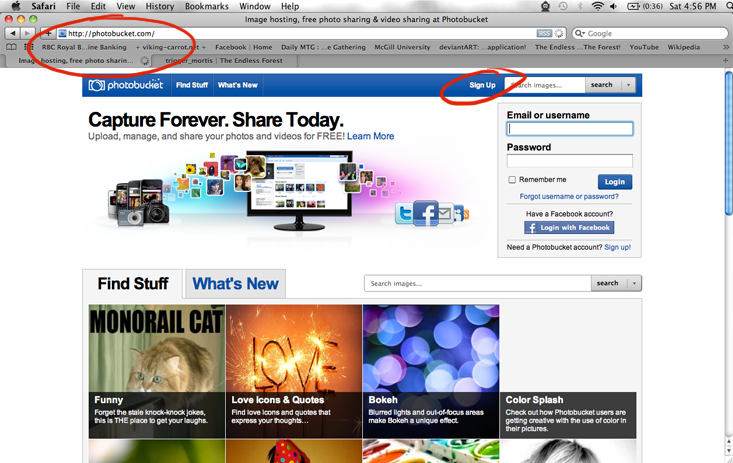
Before you can post a picture on this website, you first need to
upload that picture to a host site, such as
Photobucket.
Since this is the first time using this site, you want to click on the link in the top
right that says
Sign Up
Step Two
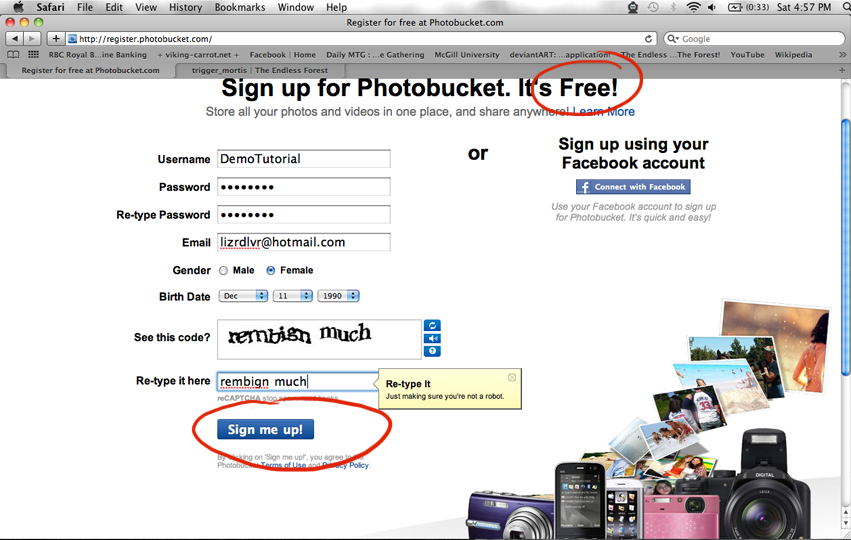
After you click the link, you are taken to a page that looks like this. Simply fill in your personal information as I've shown. Once that is done, click on the button that says
Sign Me Up!
Step Three
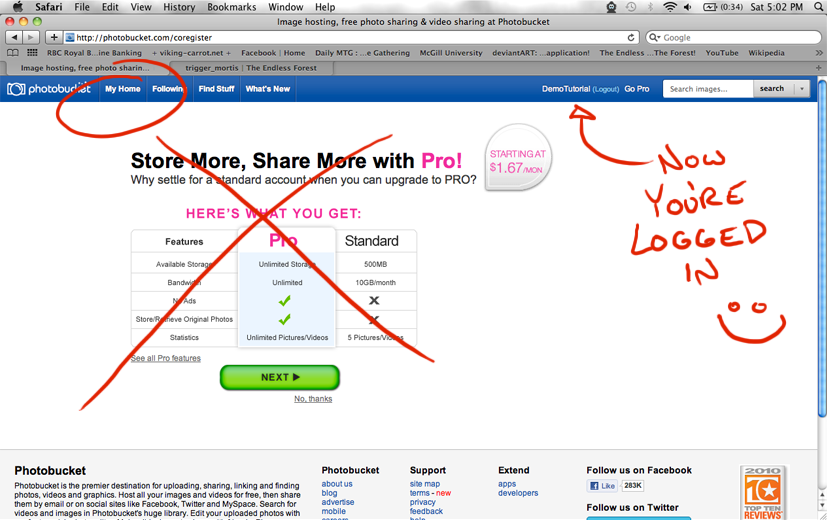
Once you've signed up, you will be taken to a page that looks like this. You can
ignore the stuff in the middle.
What you want to notice is that in the top right, your
username will now be showing with the option to log out. When you see this, you know that you are online.
Now you want to click on the link in the top
left that says
My Home.
Step Four
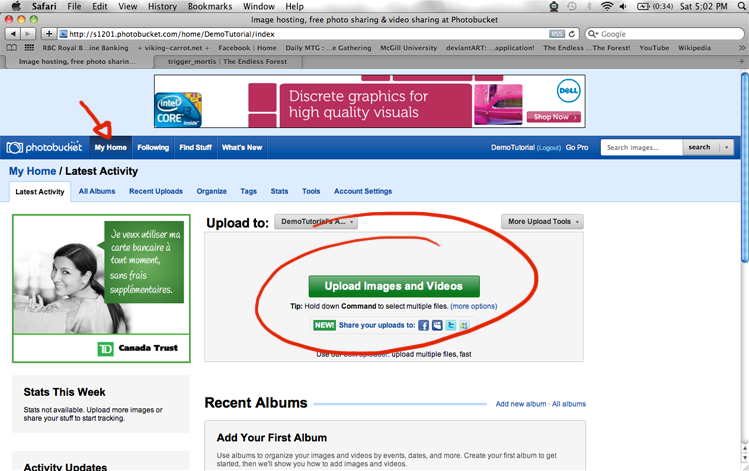
Now you are in your
Home page. This page is your friend, and is where everything happens.
When you're on this page, you can not only view your previous pictures that are uploaded, but you can also
upload new pictures. To do this, simply click on the big green bar in the middle that says
Upload Images and Videos.
Step Five
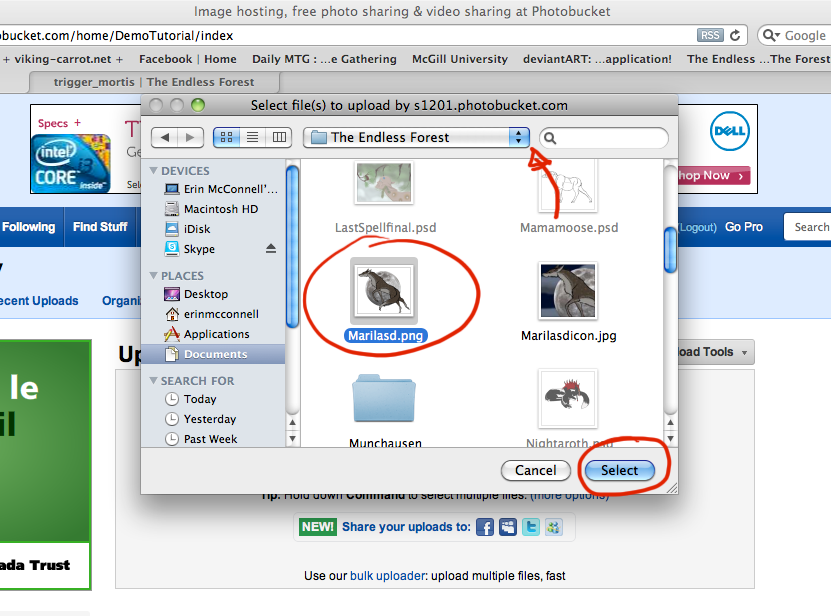
Clicking on the upload bar will open a
window that looks like this.
Note: The window that opens for you may be slightly different in appearance. I use a
Mac and the window may be slightly different for
PCs
The important thing about this window is that it allows you to
select the file from your computer that you wish to upload. Using the
drop bar at the top of the new window, find the
folder in your computer where you stored your picture file. Once you've found it, select the
file that you wish to upload and then click the button that says
Select.
Step Six
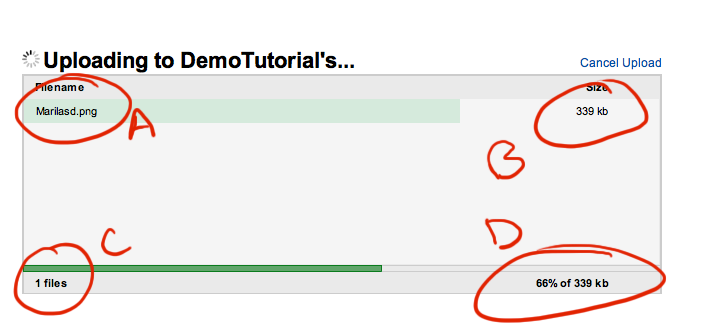
Once you've selected your picture, the window will close, and you'll see a screen that looks like this. The parts I've highlighted are as follows:
A-This shows you which file you've selected to be uploaded.
B-This shows the size of the file that you've selected.
C-This shows you how many files you've selected to be uploaded.
D-This shows the progress of your upload.
Step Seven
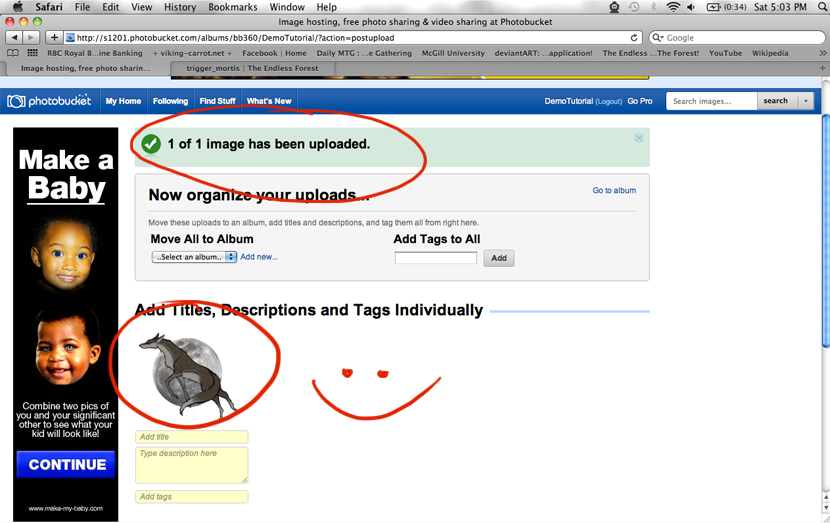 Congratulations! Your picture is now uploaded!
Once you have received the message at the top of your screen in
green, you should see a smaller version of your picture in the center of the screen.
Click on this small picture, and it will take you to the full-size version.
Step Eight
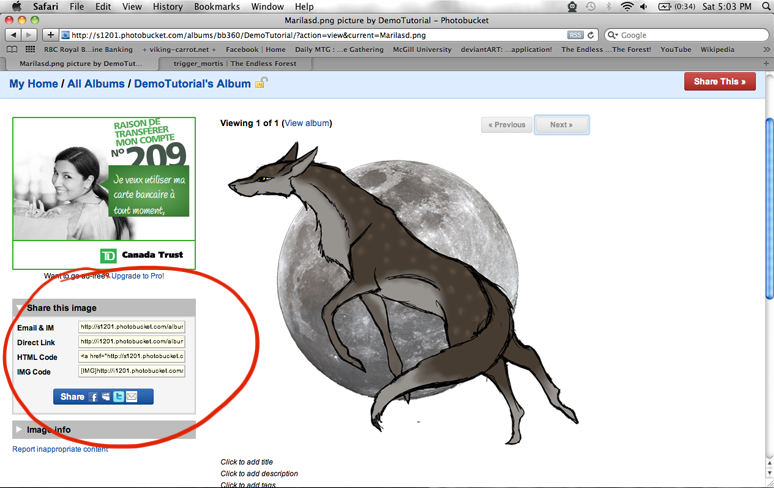
On the page with the full-size version of your picture, you should see a series of bars at the left that looks like this:
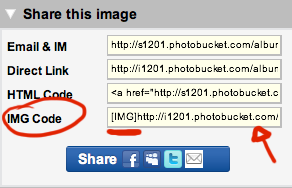
Out of these, it is easiest if you select the one called
IMG Code. This code already has the
IMG tags that you need to make your picture visible on the community site.
Copy this code, and then go to the Community site.
Step Nine
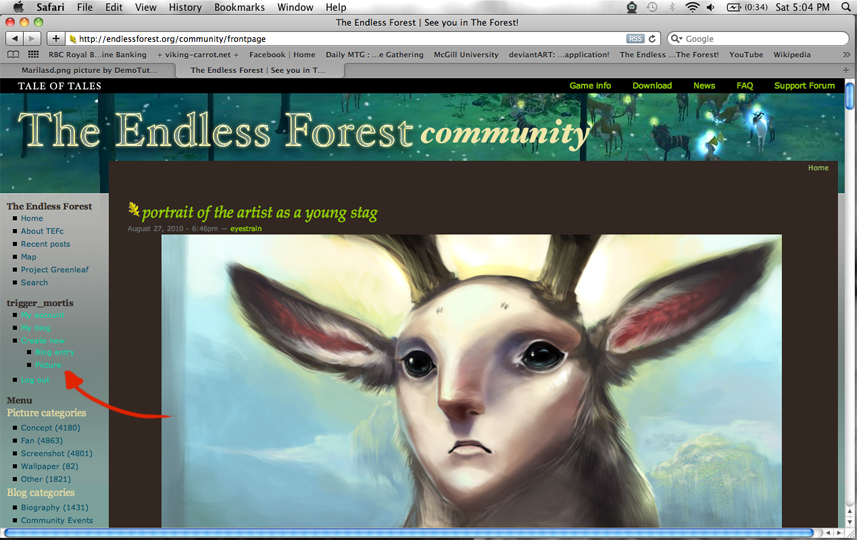
Once on the Community site, click on the link on the
left that says
Create New: Picture.
Step Ten
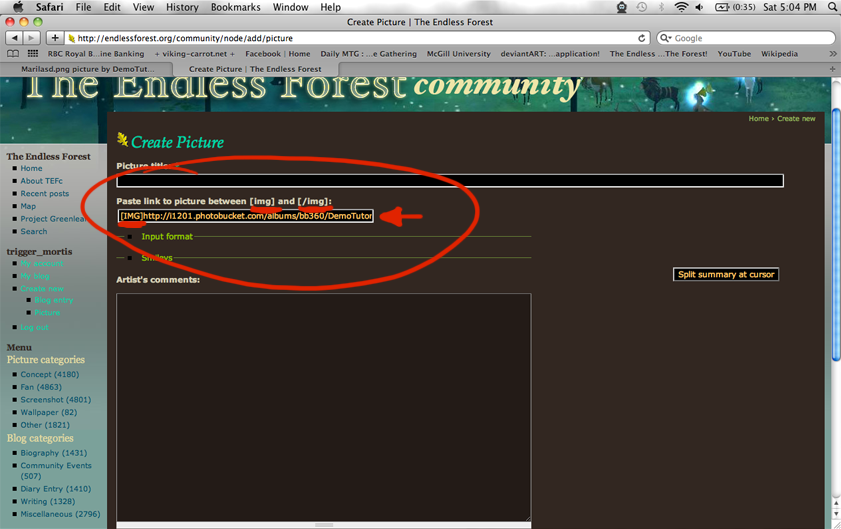
In the bar underneath "Paste link between...",
paste the link that you copied from Photobucket.
The key to having any image show on the site is to
make sure that the address is between the IMG tags, as shown above the bar.
Step Eleven
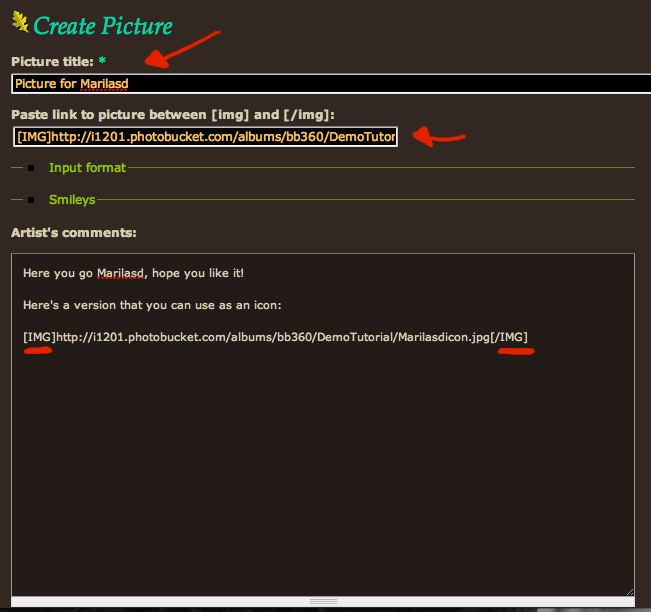
Make sure you fill out the necessary information, including a title, the image address, and whatever comments you want. If you wish to add a second picture in the comments section, you can do so by placing it between IMG tags, as shown.
Congratulations, you've now posted a picture on the Community website!
Step Twelve
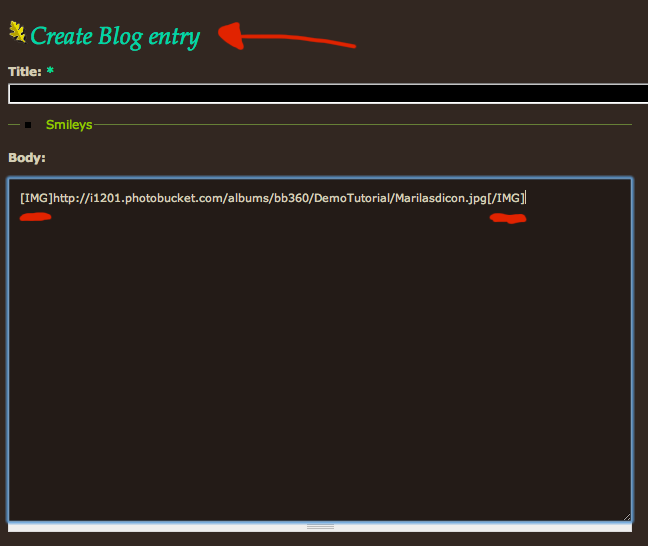
If you wish to put a picture in a blog, you can do so in the
exact same way, only minus the bar where you put the image address. Simply put the picture address between IMG tags, and voila, you now have a blog with a picture in it.
And we're done! I hope this tutorial has helped you out.
If you have anymore questions, feel free to post them in the comments, or email me at .
As well, if you have any ideas for future tutorials, post those as well! I'm always looking for new ideas, and I want to try and help those who need it.
For more tutorials, visit Terabetha's:
-
Logging In Tutorial
and
-
Making a Cut Tutorial 


This looks awesome! Thank you
Thank you Amazon, I only hope
8DDD TRIG. You are so epic, I
<33333
You're epic.
^^ Thanks Ammy! I can only
YES. It used to be so hard to
Now we just have to link to these tiny posts made of awesomeness
THIS IS A TRACK.
^^ I'm glad I could provide
Thank you for your hard work.
I don't strive to be the best, but instead I strive to do my best, and always give it my all every time.
-faunet
You're most welcome
wow, thank you trigger! this
You're very welcome m'dear!
could you like totally make
That's a good idea
THANK YOU. xD I now
You're very welcome
Why have I not found this
A big thank you for making this! ^_^
You're very welcome! I'm glad
hi im sorry i tried to log in
Awe: Where did you try to log
thanks write it down for me
If you go to Photobucket.com
Username: TEFstorage
Password: forest2011
Hope that helps!
thank you!
-.- There's a new sign up and
Oh can I use it too?